
Replacing inline skate wheels at home is a simple 10-minute task that saves money and extends your skates’ life. You only need a T-handle Allen wrench and a new set of wheels to restore speed and control.
This complete guide provides expert tips on removing old bearings, matching wheel durometers to your skating style, and avoiding common mistakes. Follow these proven methods to get your skates rolling like new again today.
Best Inline Skate Wheels for Speed and Durability
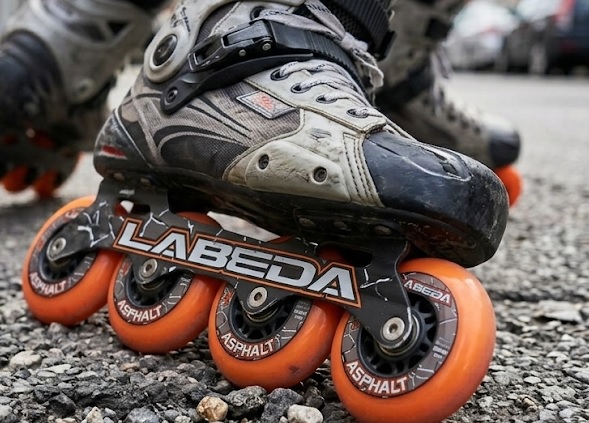
Labeda Asphalt Black 80mm/85A – Best Overall Choice
The Labeda Asphalt Black (80mm/85A) offers unmatched durability for outdoor skating. Its high-rebound urethane absorbs vibration while maintaining speed on rough asphalt. Ideal for aggressive street skaters who need reliable grip and long-lasting performance on abrasive surfaces.
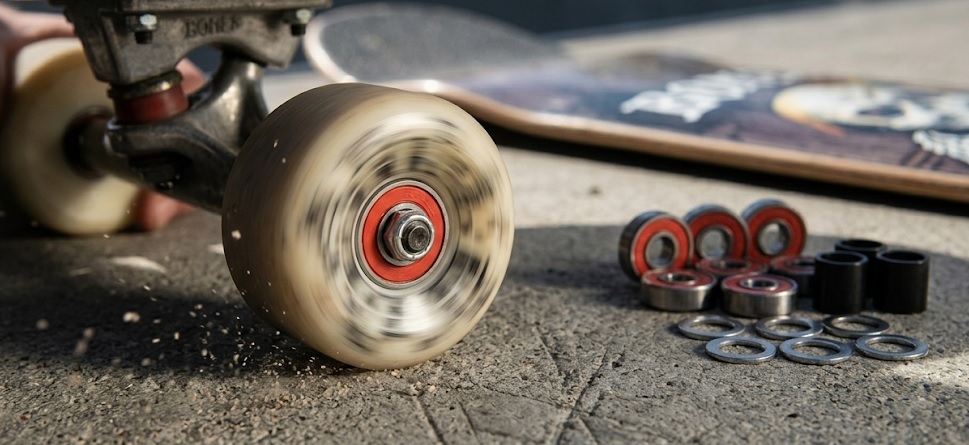
Bones Wheels Super Reds 80mm/88A – Best for Speed
The Bones Super Reds 80mm/88A deliver premium speed with a hard, fast formula. Designed for experienced skaters on smooth surfaces like rinks or basketball courts. The precision bearings reduce rolling resistance, making it the best option for high-speed training and fitness skating.
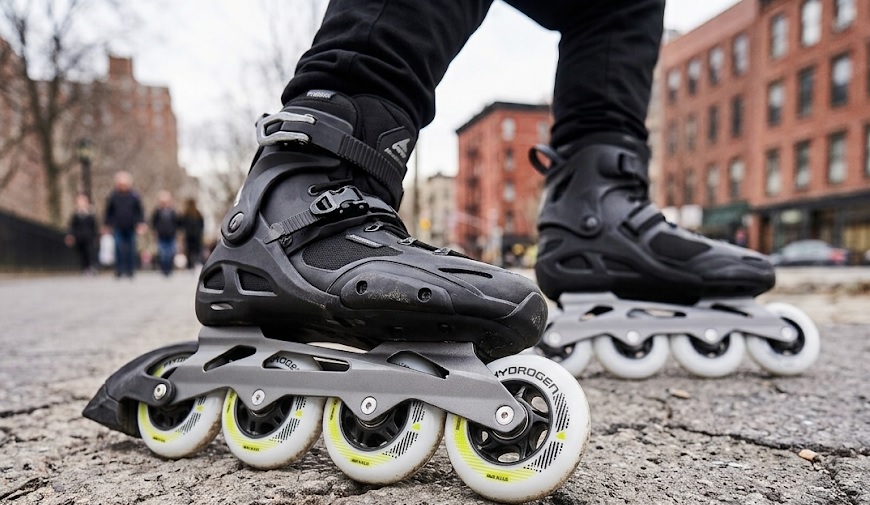
Hydrogen 85mm/85A – Best for Recreation
The Hydrogen 85mm/85A provides a smooth, stable ride for casual skaters and commuters. Its larger diameter rolls over cracks and debris effortlessly. The balanced durometer offers excellent grip without sacrificing comfort, making it a recommended choice for long-distance recreational skating.
How to Remove Old Inline Skate Wheels Properly
Removing old wheels correctly prevents damage to your bearings and frame. Always work on one wheel at a time to keep axles organized. This process takes under five minutes with the right tools.
Tools You Need for Wheel Replacement
A T-handle Allen wrench (typically 4mm or 5mm) is essential for loosening axle bolts. You also need a bearing puller tool to safely remove bearings without bending them. A clean rag helps wipe away dirt and debris.
Step-by-Step Wheel Removal Process
- Loosen the axle bolt by turning counter-clockwise with your Allen wrench until it spins freely.
- Slide the axle out completely from the frame and set it aside in a safe spot to avoid losing it.
- Remove the wheel from the frame, keeping the bearings inside the wheel hub for now.
Key Takeaway: Always remove wheels in order and keep axles with their original wheel to avoid mixing sizes. This prevents alignment issues during reassembly.
How to Remove Bearings Without Damaging Them
Using a bearing puller is the safest method to extract bearings from old wheels. Place the puller’s prongs behind the bearing and twist gently to pop it out. If you don’t have a puller, use the axle to push the bearing out from the opposite side.
- Work on one bearing at a time to maintain control.
- Clean bearings immediately with a dry cloth to remove grit.
- Inspect for damage like rust or flat spots before reusing.
Choosing the Right Replacement Wheels for Your Skates
Selecting the correct replacement wheels directly impacts your speed, grip, and comfort. Focus on durometer (hardness) and diameter first to match your skating surface and style. The wrong choice leads to poor performance or premature wear.
Understanding Wheel Durometer and Size
Durometer measures wheel hardness on a scale from 78A (soft) to 100A (very hard). Soft wheels (78A-82A) offer superior grip on rough outdoor surfaces but wear faster. Hard wheels (88A-100A) provide less grip but roll faster on smooth indoor rinks.
- 78A-82A: Best for rough asphalt, cracks, and outdoor trails.
- 84A-87A: Ideal for mixed surfaces and recreational skating.
- 88A-100A: Perfect for indoor rinks, smooth concrete, and speed skating.
Key Takeaway: Match wheel durometer to your primary skating surface. Outdoor skaters should choose 78A-85A; indoor skaters should choose 88A or higher.
Wheel Diameter: Small vs. Large Wheels
Wheel diameter ranges from 72mm to 125mm and affects acceleration and top speed. Smaller wheels (72mm-80mm) accelerate faster and offer better maneuverability for tricks. Larger wheels (84mm-125mm) maintain higher speeds and roll over debris more easily.
- 72mm-80mm: Great for aggressive skating, urban slalom, and quick turns.
- 84mm-90mm: Balanced option for fitness skating and commuting.
- 100mm-125mm: Designed for speed skating and long-distance touring.
When to Replace vs. Rotate Your Wheels
Rotate your wheels every 10-15 hours of skating to ensure even wear and extend their lifespan. Replace wheels when you notice flat spots, uneven wear patterns, or a diameter reduction of 2mm or more. Skating on worn wheels reduces stability and increases vibration.
How to Install New Inline Skate Wheels Correctly
Installing new wheels requires precision to ensure smooth rolling and safe skating. Always install bearings and spacers in the correct order to prevent binding or wobbling. Follow this process for a perfect fit every time.
Step-by-Step Guide to Mounting Bearings in New Wheels
Press the first bearing into the wheel hub using firm, even pressure. Place the bearing spacer in the center of the wheel, then press the second bearing in from the opposite side. Ensure both bearings sit flush against the inner hub walls.
- Align the bearing squarely with the wheel hub opening before pressing.
- Use a bearing press tool or the flat side of your axle to push bearings in evenly.
- Spin the bearing after installation to confirm it rotates freely without resistance.
Key Takeaway: Never hammer bearings into place. Use steady, even pressure to avoid damaging the bearing shields or raceways.
Proper Axle Tightening Techniques
Tighten the axle bolt until the wheel spins freely with minimal side-to-side play. Overtightening compresses the bearings and causes friction, slowing you down. Undertightening leaves the wheel loose, leading to wobble and uneven wear.
- Snug the bolt finger-tight first, then use your Allen wrench for a final quarter turn.
- Check wheel spin after tightening; it should rotate smoothly for several seconds.
- Adjust if needed by loosening slightly if the wheel feels stiff or binding.
Final Checklist Before Your First Skate
Verify all eight wheels spin freely and the frame is aligned before stepping onto your skates. Tighten any loose axles and ensure bearings are seated correctly. A quick test roll on a flat surface confirms everything is working properly.
Common Mistakes to Avoid When Replacing Skate Wheels
Even experienced skaters make errors during wheel replacement that affect performance. Avoiding these common pitfalls saves time and prevents damage to your new wheels and bearings. Learn what to watch for before you start.
Using the Wrong Tools or Applying Too Much Force
Using a standard screwdriver instead of a proper Allen wrench strips axle bolts. Always use the correct hex key size (usually 4mm or 5mm) to avoid rounding bolt heads. Applying excessive force can also warp the axle or crack the wheel hub.
- Never use pliers on axle bolts; they damage the hex socket.
- Apply steady pressure rather than jerking or twisting violently.
- Replace stripped bolts immediately to prevent wheel detachment while skating.
Key Takeaway: Invest in a quality T-handle Allen wrench set. It provides better leverage and reduces the risk of stripping bolts compared to cheap L-shaped keys.
Installing Bearings Backwards or Missing Spacers
Bearings have a shielded side that must face outward to keep dirt and moisture out. Installing them backwards exposes the internal balls to debris, causing rapid failure. Always check that the rubber shield is visible on the outside of the wheel.
- Always use bearing spacers between the two bearings inside the wheel hub.
- Missing spacers cause bearings to compress sideways when tightening the axle.
- Compressed bearings create friction, reduce speed, and wear out prematurely.
Neglecting to Break In New Wheels Properly
New wheels have a smooth, slick surface that requires a break-in period. Skating aggressively on brand-new wheels can cause sliding or loss of control. Take your first few sessions slowly to scuff the surface and build grip gradually.
- Skate on clean, dry surfaces for the first hour to avoid picking up debris.
- Perform gentle turns and stops to wear in the edges evenly.
- Avoid sudden hard stops until the wheels develop a slight flat contact patch.
How to Maintain Your Inline Skate Wheels for Longevity
Proper maintenance extends the life of your wheels and bearings significantly. Regular cleaning and rotation prevent uneven wear that forces premature replacement. A few minutes of care after each session makes a big difference.
Cleaning Your Wheels After Every Skate Session
Wipe down each wheel with a dry cloth after skating to remove dirt and moisture. Pay special attention to the bearing area where debris accumulates most. For deeper cleaning, remove the wheels and wash them with mild soap and warm water.
- Dry wheels thoroughly before reinstalling to prevent rust on axles.
- Avoid harsh chemicals like acetone that can degrade urethane wheel material.
- Clean bearings separately using a bearing cleaner kit for best results.
Key Takeaway: A quick post-skate wipe-down takes 30 seconds but prevents dirt from grinding into your bearings and wheel surfaces.
Rotating Wheels for Even Wear Patterns
Rotate your wheels every 10-15 hours of skating to balance wear across all positions. Front wheels wear faster on the outer edge during turns, while rear wheels wear more from pushing. A simple rotation pattern doubles the usable life of your wheel set.
- Swap front and rear wheels on the same skate to redistribute wear.
- Flip wheels left to right to even out inside and outside edge wear.
- Mark wheel positions with a permanent marker to track your rotation schedule.
Storing Skates Properly Between Uses
Store your skates in a cool, dry place away from direct sunlight and heat sources. UV rays and high temperatures degrade urethane wheels over time, causing them to harden or crack. Keep them in a breathable bag rather than an airtight container to prevent moisture buildup.
When to Replace Bearings During Wheel Changes
Bearings are the most overlooked component when replacing inline skate wheels. Installing new wheels on worn bearings ruins performance immediately and creates dangerous wobble. Knowing when to swap bearings saves money and keeps you safe.
Signs Your Bearings Need Replacement
Listen for grinding noises or feel for rough spinning when turning the wheel by hand. Visible rust, pitted surfaces, or missing shields are clear indicators of bearing failure. If a bearing feels gritty after cleaning, it requires immediate replacement.
- Slow spinning that stops abruptly indicates internal damage or dried lubricant.
- Side-to-side play in the bearing suggests worn races that cannot be repaired.
- Excessive heat from bearings after skating signals friction from contamination.
Key Takeaway: If you are unsure about bearing condition, replace them. A $15 bearing set is cheaper than repairing a damaged frame or treating an injury from a wheel locking up.
How to Choose Replacement Bearings for Your Skates
Standard 608 bearings fit most inline skate wheels and are widely available. Choose between ABEC ratings (1-9) which indicate precision tolerance, with higher numbers offering smoother spin. For outdoor skating, look for bearings with rubber shields (ZZ or 2RS) to block dirt.
| Bearing Type | Best Use | Shield Type |
|---|---|---|
| ABEC 3 | Recreational skating | Rubber (2RS) |
| ABEC 5 | Fitness and commuting | Rubber (2RS) |
| ABEC 7 | Speed and indoor skating | Metal (ZZ) |
Installing New Bearings in Your New Wheels
Always install new bearings with clean hands to avoid transferring grease or dirt. Press bearings in evenly using a bearing press tool or the axle itself. Spin each bearing after installation to confirm smooth, quiet rotation before mounting the wheel.
Cost Comparison: DIY Wheel Replacement vs. Professional Service
Replacing inline skate wheels at home saves significant money compared to shop services. A professional wheel swap costs $15-$25 in labor alone, plus the price of wheels and bearings. DIY replacement requires only a one-time tool investment of under $20.
Breaking Down the Costs of Each Option
A basic Allen wrench set costs $8-$12 and lasts for years of wheel changes. Professional shops charge $15-$25 for labor on a full wheel replacement, which takes them only 10 minutes. Over four wheel changes per year, DIY saves you $60-$100 annually.
| Expense | DIY Cost | Shop Cost |
|---|---|---|
| Tools (one-time) | $8 – $12 | $0 |
| Labor per change | $0 | $15 – $25 |
| Wheels (set of 8) | $40 – $80 | $40 – $80 |
| Bearings (set of 16) | $15 – $40 | $15 – $40 |
Key Takeaway: After your first DIY wheel change, you recover the tool cost entirely. Every subsequent replacement saves you the full shop labor fee of $15-$25.
Time Investment: DIY vs. Professional Service
A professional shop completes a wheel replacement in 10-15 minutes but requires travel time and scheduling. DIY replacement takes 20-30 minutes your first time, decreasing to 10-15 minutes with practice. You also avoid waiting days for a shop appointment during peak season.
- DIY first attempt: 20-30 minutes including learning curve.
- DIY after practice: 10-15 minutes for a full set of eight wheels.
- Shop visit: 30-60 minutes including travel and wait time.
When Professional Service Makes Sense
Consider professional help if you lack the physical strength to loosen tight axle bolts. Shops also handle seized or rusted bolts that require specialized tools. For skaters with complex frame systems or limited mobility, the $15-$25 labor fee is well worth the convenience.
Conclusion: Master Replacing Inline Skate Wheels at Home
Replacing inline skate wheels at home is a simple, cost-effective skill that every skater should learn. You save $60-$100 annually while gaining confidence in maintaining your own gear.
Start with quality wheels and bearings matched to your skating surface. Practice the removal and installation steps until they feel natural.
Grab your Allen wrench and a fresh set of wheels today. Your skates will feel faster, smoother, and safer with every stride.
Frequently Asked Questions about Replacing Inline Skate Wheels
How often should I replace my inline skate wheels?
Replace your wheels every 6-12 months depending on skating frequency and surface type. Outdoor skaters on rough asphalt may need new wheels every 3-4 months, while indoor skaters can often go a full year. Check for flat spots, uneven wear, or diameter reduction of 2mm or more.
A simple test is to feel for vibration while skating on smooth pavement. If you notice shaking or hear a thumping sound, your wheels likely have flat spots and need replacement immediately for safety.
What tools do I need to replace inline skate wheels at home?
You need a T-handle Allen wrench in the correct size (usually 4mm or 5mm) for axle bolts. A bearing puller tool helps remove bearings without damage, though you can use the axle as an alternative. A clean rag and small screwdriver are useful for cleaning debris.
Optional but recommended tools include a bearing press for easy installation and a skate tool with multiple functions. These tools cost under $20 total and last through dozens of wheel changes.
Can I use any wheels on my inline skates?
No, you must match wheel diameter and durometer to your skating style and frame type. Most recreational skates use 80mm wheels, while speed skates use 100mm-125mm wheels. Always check your frame’s maximum wheel size before purchasing replacements.
Durometer (hardness) must match your surface. Use 78A-82A for outdoor rough surfaces, 84A-87A for mixed use, and 88A-100A for smooth indoor rinks. Using the wrong durometer reduces grip or causes premature wear.
How do I know what size bearings my skates need?
Most inline skates use standard 608 bearings, which measure 8mm inner diameter and 22mm outer diameter. Some high-end speed skates use micro bearings (688 size) with a 6mm inner diameter. Check your current bearings for stamped numbers to confirm the size.
Always buy bearings with rubber shields (2RS) for outdoor skating to block dirt and moisture. Metal shields (ZZ) are suitable for clean indoor environments but offer less protection against debris.
What is the correct way to rotate inline skate wheels?
Rotate wheels every 10-15 hours of skating by swapping front and rear positions on the same skate. Also flip wheels left to right to even out inside and outside edge wear. Mark each wheel with a permanent marker to track your rotation schedule.
A simple rotation pattern doubles wheel life. Front wheels wear faster on outer edges during turns, while rear wheels wear more from pushing. Consistent rotation prevents uneven wear that causes vibration and reduced performance.
Why do my new wheels feel slower than my old ones?
New wheels have a slick, smooth surface that requires a break-in period of 1-2 hours. During this time, the urethane develops microscopic texture that improves grip and rolling efficiency. Skate gently on clean surfaces to speed up the break-in process.
Another reason is incorrect bearing installation or overtightened axles. Check that bearings spin freely and axles are snug but not compressed. If wheels feel stiff, loosen the axle bolt slightly and re-test.
Can I reuse old bearings with new wheels?
Yes, you can reuse bearings if they spin smoothly, show no rust, and have intact shields. Clean them thoroughly with a bearing cleaner or isopropyl alcohol before reinstalling. Re-lubricate with lightweight bearing oil after cleaning.
Replace bearings if they feel gritty, make grinding noises, or have visible damage. Installing new wheels on worn bearings wastes the performance benefits of fresh wheels. A $15 bearing set is a worthwhile investment for optimal performance.
What should I do if my axle bolt is stuck or stripped?
Apply penetrating oil like WD-40 to the bolt head and let it sit for 10 minutes. Use a quality Allen wrench with a tight fit to avoid further stripping. If the bolt is already stripped, use a screw extractor tool or visit a skate shop for professional removal.
Prevent future stuck bolts by applying a tiny drop of anti-seize compound to threads when reinstalling. This prevents corrosion bonding between the axle and frame, making future wheel changes much easier.